Stunning Websites to Take Your Wellness Practice Online
What if you could finally take your business online without worrying about all of the tech?
Launch your new site and learn how to use it to attract clients online in just a matter of days.
Stunning Websites to Take Your Wellness Practice Online
What if you could finally take your business online without worrying about all of the tech?
Launch your new site and learn how to use it to attract clients online in just a matter of days.
Let’s Pandemic-Proof Your Practice and Get You Set Up to Work with Clients Online.
We believe that every practitioner should have an incredible website.
(you’re doing some of the most important work, after all!)
Let’s Read the Label, Shall We?
Here’s exactly what you get when you purchase any of our designs:

A fully customizable website template
Each of our layouts are fully customizable, mobile-optimized, SEO-friendly websites designed using the trusted editing platform, Divi (Divi purchased separately, but we’ll walk you through each step). Note: each layout must be used with Divi.
You’ll also receive all of the images and fonts you see in the demo site.

Step-by-step videos to guide you
You’re not just getting a website template when you purchase our designs, you’re getting the full Weekend Web Design course, which walks you through literally every step (including setting up your domain and hosting plan, uploading your site, creating your branding, editing your site, and launching).

Training to develop your unique branding
Those step-by-step videos do more than show you how to put your site together. They hold your hand through creating your very own stunning brand (think: just the right colors, fonts, look & feel for you business) that you can use for all of your marketing materials.
Here’s How it Works:
01
Choose Your Layout
Browse our designs and choose your favorite layout specifically crafted for wellness professionals wanting to launch their site and set up the foundations for an online practice.
02
Watch & Customize
Customize your site while watching our completely step-by-step videos. No tech skills needed… we take out all of the guesswork so you can get up and running fast. The course is self-paced and you have lifetime access to all of the content.

03
Learn to Use Your Site to Attract Clients Online
Having a beautiful website is one thing. Knowing how to use it to get clients is another. Learn how to create branding, marketing messages, and website content that attracts the right kind of clients.

I just want to say thank you so, so, so much for making this course!! I technically haven’t even finished all the modules yet, and I already have an amazing new site. I showed it to my very picky/critical sister, and she asked if I hired someone!! I cannot even imagine how long (if ever…) that would have taken me to figure out on my own! You really made everything so easy to follow. So THANKS!!!!
It was amazingly a short no-frustration experience. I think I spent a total of probably 8 hours on the course – fastest and easiest I’ve ever worked on my website. THANK YOU!!!
The Details of Our Winning Website Templates
Easy Customization
There are a lot of options out there for creating your website and some of them make it crazy complicated to customize even the most basic elements. We’ve tested many of them and have found the holy grail in a WordPress theme called Divi. With Divi’s simple design editor, you can see the changes you’re making to your site in real time, making your website customization an easier, less stressful, more straight-forward process.
Mobile Responsive
51% of the time spent online is on mobile devices. That means that your website needs to show up just as beautifully on mobile as it does on a desktop computer. And believe it or not, not all website layouts are designed with that in mind! We’ve taken care of the work for you by optimizing each of our designs for mobile, tablet, and desktop. Plus, Divi’s design editor allows you to easily adjust the settings for how your site appears across all devices. Yay for Divi!
SEO Friendly
WordPress is extremely SEO-friendly from the outset. When you pair that with the SEO-friendly Divi theme as well as the SEO strategies we’ll share with you in Weekend Web Design, you’re well equipped for visibility in the world of SEO.
Helpful Support
Taking something complex and breaking it down so that it’s simple and understandable? It’s one of our superpowers. Each of our videos take you step-by-step through every. single. aspect. of getting your beautiful new site up and running (and attracting clients). And if you do have any questions along the way, we’re here for you! Between our team and Divi’s awesome support team, you’ll have the support you need for whatever questions you might have.
Thank you for your support. I really am not very computer literate so your Weekend Web Design step by step is sooooo helpful!!!
HEA owner, Jessica, reliably backs her products. I ran into a snag getting my website up and running, but she responded quickly and professionally. When she says she will walk you through it step-by-step, she means it!
Looking for a detailed walkthrough of how Weekend Web Design works?
Let’s do it!
01
Choose Your Layout
Lemongrass
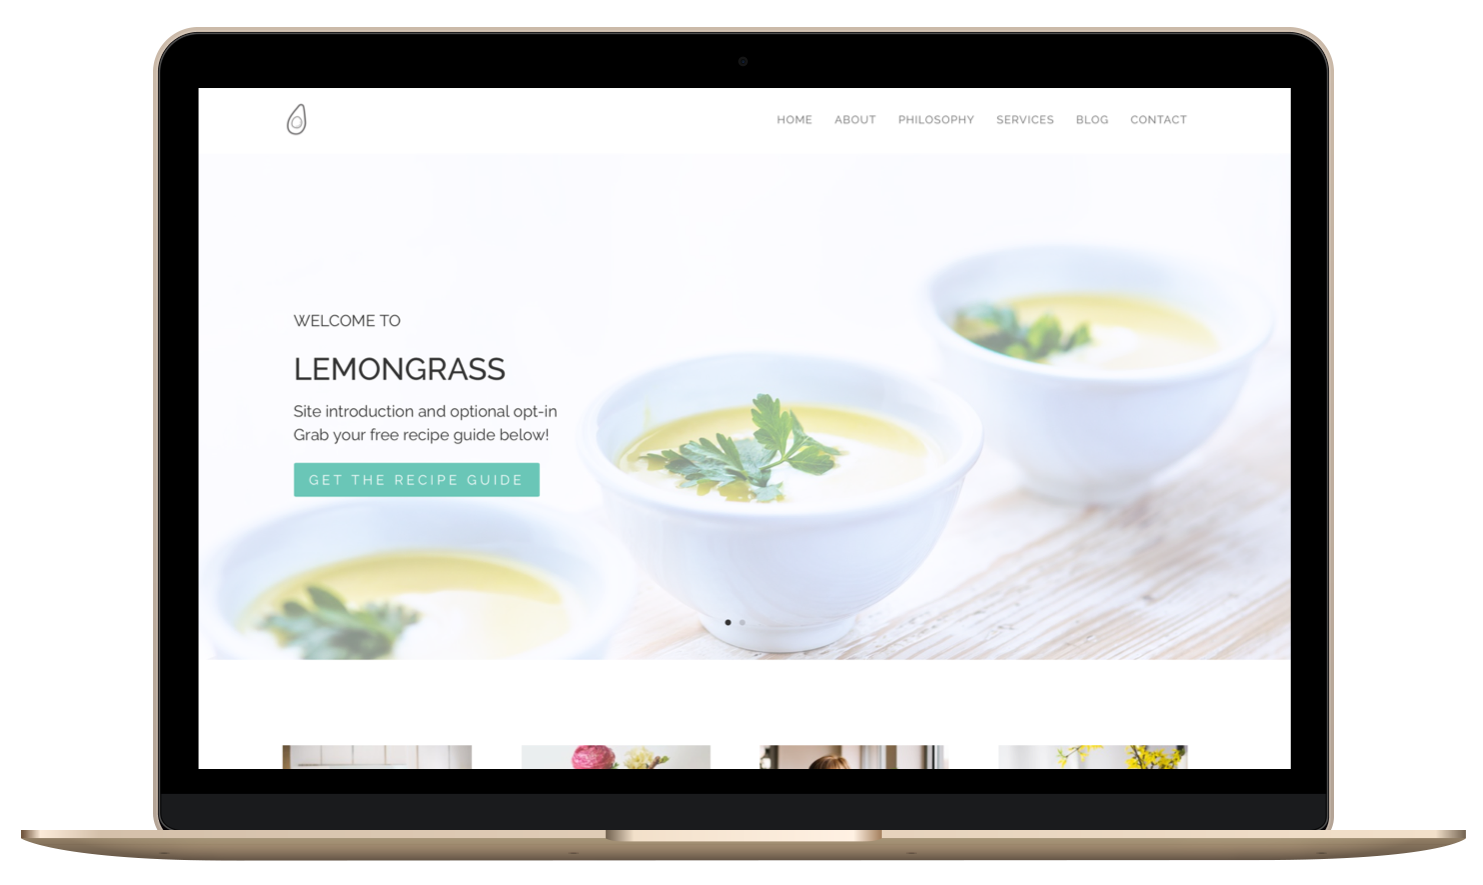
Bright, vibrant, clean.
The Lemongrass design is perfect for wellness professionals who want a spacious, classic design to showcase their services.
Rosehip
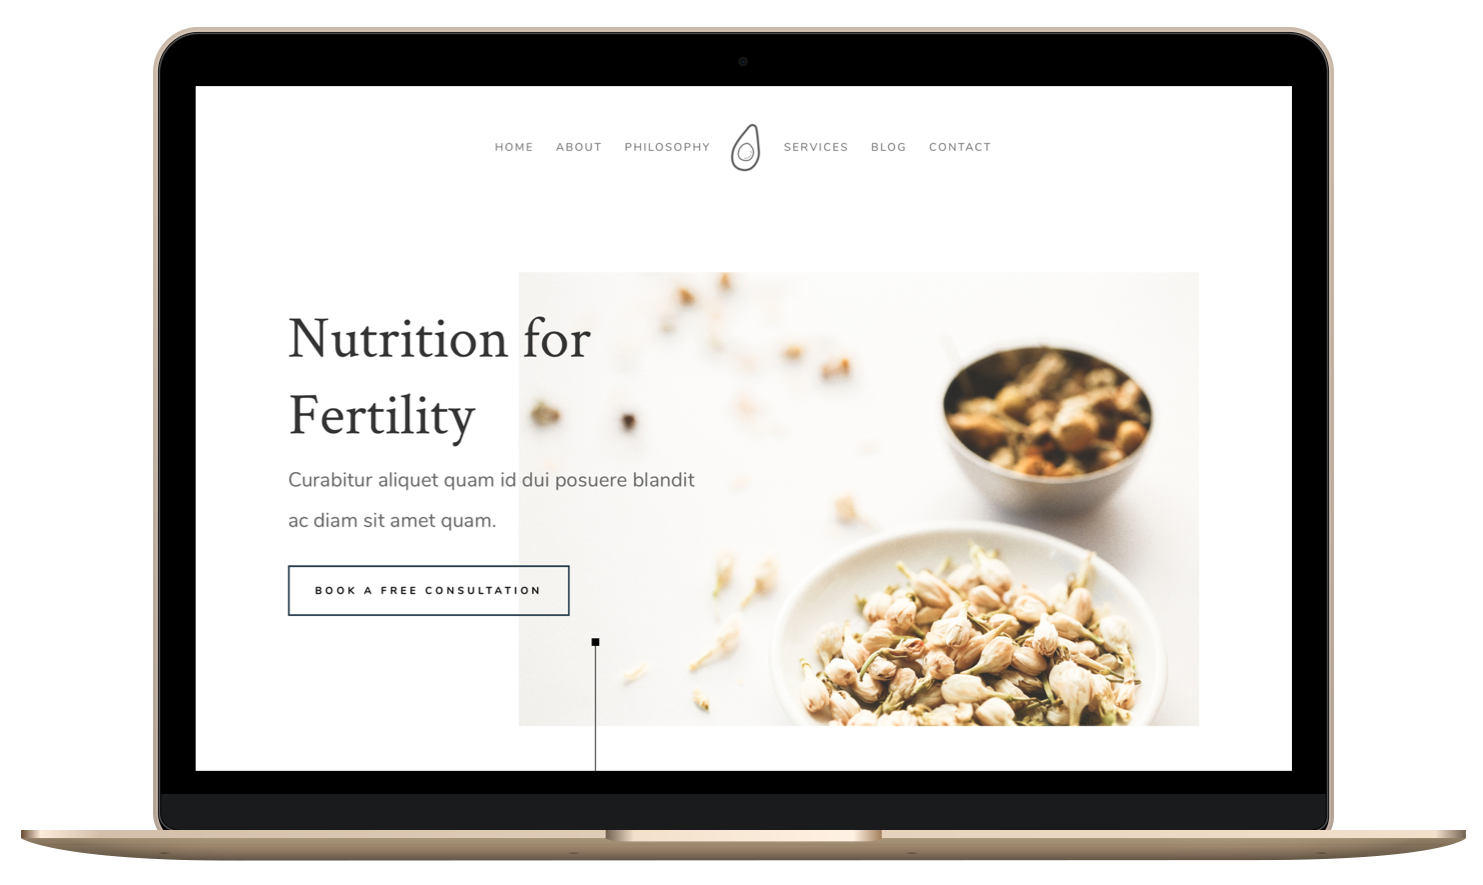
Soft, soothing, beautiful.
The Rosehip design was crafted for health and wellness professionals who want a lovely website that caters to a feminine audience.
Tulsi
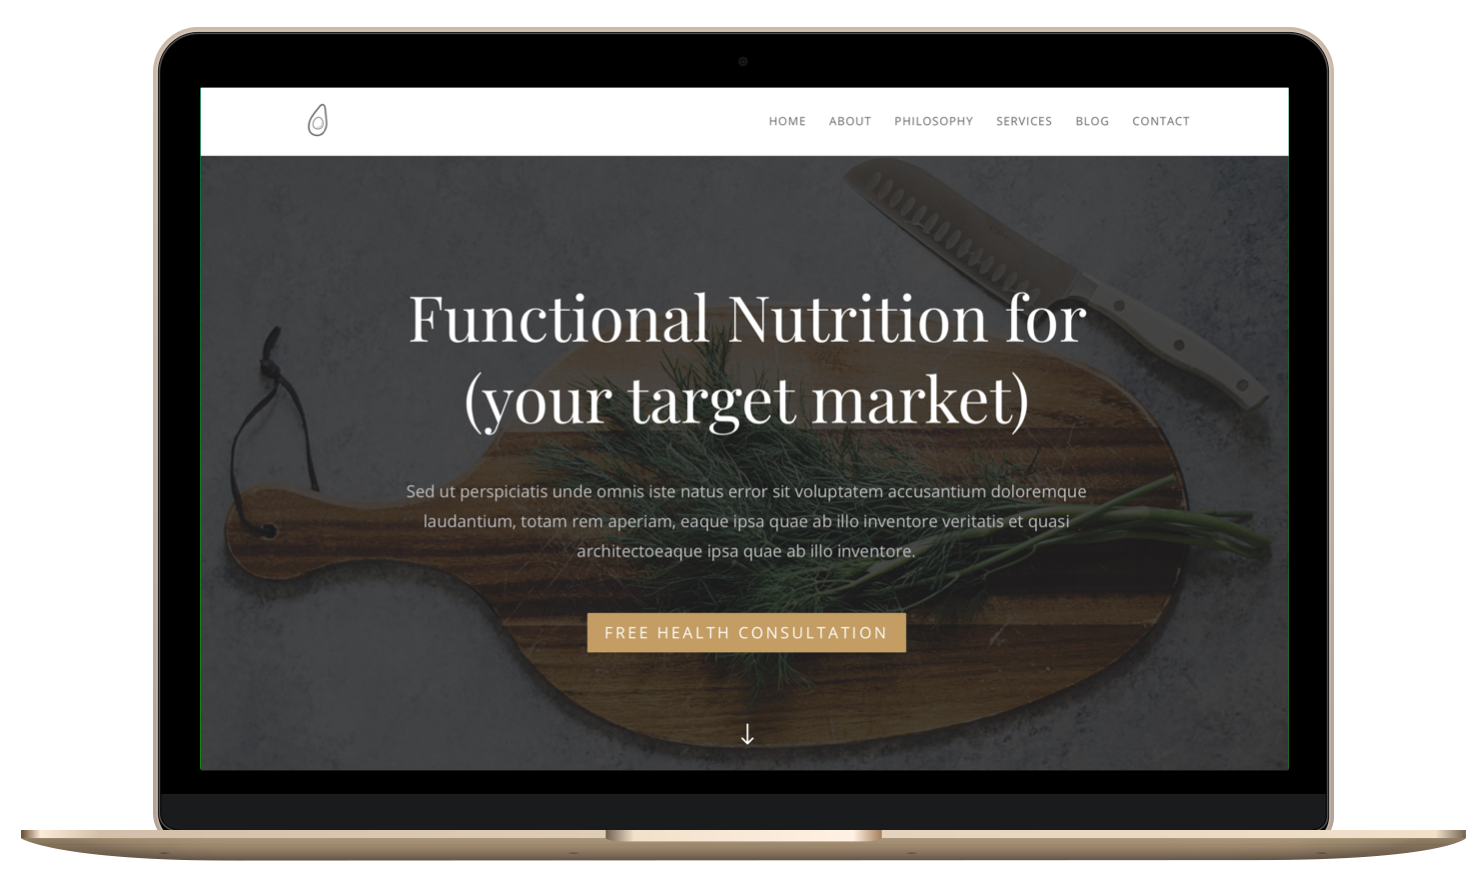
Relaxed, modern, stylish.
With its clean lines and bold images, the Tulsi design is powerful in its elegance and simplicity for health and wellness professionals.
FANTASTIC COURSE!!! So, so, so grateful that you broke this down! I’ve mastered the WordPress beast and feel like I can conquer anything online. Thank you for the boost of self confidence!
Jessica, I LOVE how you go step-by-step! I never could have done this without your program. And, you did all the ground work for us! Thank you!
02
Set Up Your Website Step by Step
Three modules of Weekend Web Design take you step-by-step through setting up your website.
No confusion. No tech skills needed. We take out all the guesswork so you can get up and running fast.
Plus, you get lifetime access to all the materials in this self-paced course.
Module 1: Domain & Host It
In this module, you are going to set the very foundation for your beautiful website by choosing and purchasing your domain name and getting your hosting all squared away.
Lesson 1: Choose Your Domain
Tips for choosing the right domain (and what to avoid) along with the steps to secure it
Lesson 2: Sign Up for Hosting
Sidestep the pitfalls of poor quality hosting and get set up with a dream host in no time
Lesson 3: Install WordPress
Once you’ve secured your hosting, you’ll be able to do this with the click of a button!
Lesson 4: Set Up Your Domain Name Email Address
Elevate your email professionalism with a name@yourdomain.com email address
Module 2: Theme It
In this module, we’re going to be learning all about themes and plugins – two very important components to your site that give it the look, feel and functionality that you want.
Lesson 1: What are Themes?
Learn what a theme is and how it can transform the look of your site in an instant
Lesson 2: Install the Theme
This guide takes you through the installation of your new, beautiful theme
Lesson 3: What are Plugins?
Learn what these little tools are inside of your website that perform all kinds of magic
Lesson 4: Install the Plugins
Here we go over the most important plugins you need for a professional website
Module 4: Design it
In this module, we’ll be digging in to the very heart of this course – setting up your actual website. By the end of this module, you’re going to have your site set up and laid out just like you expected when you started this course, only it will be even better, because the colors and fonts are going reflect your brand.
Lesson 1: Set Up Your Website Structure
Here, we’ll be getting your website set up and ready to go!
Lesson 2: Customize Your Site & Pages Using Your Branding Board
In this lesson, you’ll be going through a series of videos to create and design your site
Lesson 3: Adjust your Blog Settings and Create Your First Post
Get your message out in the world!
Lesson 4: Make Your Site Compliant
Here, we’ll be covering the compliance-related pages such as disclaimers, terms and conditions, and more.
03
Learn How to Use Your Site to Attract Clients Online
Our step-by-step videos do more than show you how to put your site together. During module 3, we’ll hold your hand through creating your very own stunning brand (think: just the right colors, fonts, look & feel for your business) that you can use for all of your marketing materials moving forward.
And during module 5, you’ll learn how to launch your online practice and modern, effective strategies for using your website to attract clients online.
Plus, you get lifetime access to all the materials in this self-paced course.
FAQs
What else do I need to use these designs? Are there any other expenses involved?
There are no recurring fees with the Weekend Web Design program itself, and you have lifetime access to the materials. That said, there are standard expenses involved in running your own website (that you will pay to other companies, not us). Specifically, you’ll need a license for the website theme as well as a domain/hosting plan. We’ll show you the best way to get these and walk you through every step!
I already have a domain or hosting plan… is that an issue?
Not at all! You’ll just be skipping the first few steps of the course where I walk you through the domain and hosting set up, and digging right into installing your new theme. If you only have a domain but no hosting yet, we’ll also be covering how to navigate this.
Can these designs only be used with Divi?
Yes, these design files are only compatible with Divi.
Are these websites responsive/mobile friendly?
Definitely! They look beautiful across all devices – mobile, tablets, laptops and desktops. You can see this in action by visiting those demo theme sites right on any device.
Can I add my own images to the site?
Absolutely! You can change out any and all of the images that you see on the layouts.
Can I further customize these layouts? For example do I have to include each of the sections on the pages?
Yes, you can definitely customize it further on your own. The course will show you each step of setting up the website so that it looks like the demo site (and I will show you how to customize it with your colors, fonts and images), but during that process you’ll start to get an idea of how flexible the site really is. After the course, you’re welcome to customize your site to your heart’s content!
What is your refund policy?
Due to the digital nature of these design templates, they cannot be returned and are therefore non-refundable. That said, we want you to be completely happy with your purchase! So if you have trouble, let’s work together. We find that most issues can be easily fixed, so just reach out to us at: support@holisticentrepreneurassociation.com
Do I have to be a practitioner to use these designs and go through Weekend Web Design?
The layouts and accompanying course were created to support all kinds of health practitioners, but in truth, anyone who wanted a website could take this course. You’re welcome to adapt any of the website content to make it appropriate for your unique site.
Who does the website maintenance and updates after the site is completed? Is that something I'll be able to do?
Yes, I will be showing you how to do your updates and maintenance. It’s pretty simple once you know the steps!
Who does the website maintenance and updates after the site is completed? Is that something I'll be able to do?
Yes, I will be showing you how to do your updates and maintenance. It’s pretty simple once you know the steps!
Do I actually need to do the course in a weekend? Or is it called that just to give us an idea of how long the course would take?
No, you don’t need to do it in a weekend, and yes, that’s exactly why it’s called “Weekend Web Design” – it usually takes about two days to do the course (though you have lifetime access to the materials, so you can take as long as you’d like!).
Will the course be able to be accessed at any time or are there set times?
Yes, you’ll have access whenever you’d like! You can go at your own pace and access the materials whenever you would like.
Can you give me an approximation of how many hours the course will take me?
The course content itself is about 4 hours long, and is designed so that you can pull up another browser window next to the course videos and follow right along, step-by-step. On average, people spend between 8-16 hours on the course, so about two full days (hence, Weekend Web Design). The biggest variable is how much time you’ll spend on the branding portion of the course. In that section, I walk you through how to pick out the colors and fonts for your brand, as well as how to design a logo. That’s where most people can take varying lengths of time, depending on how quickly they can come to a decision regarding their brand direction. We’ve had students finish the course (and their website) in as little as 5 hours.
I already have a website, but don't love it. Should I do this course?
That depends. If you want to overhaul your site and have the layout look like the layout you’re considering purchasing, then yes! If you’re not currently using the Divi theme and you’d prefer to keep your old website and theme and just want to make it look nicer, this isn’t the course for you. Reason being, these designs were built using Divi and only work using the Divi theme.
When I finish my site, do I have to make it go live right away? Or can I work on it at my own pace and make it live when I'm ready to start seeing clients?
You are totally in control of when your site goes live. The course shows you how to create a nice looking “maintenance mode” landing page (which doesn’t need to say “maintenance mode”, it can say anything you’d like) while your site is under construction.
Module 3: Brand It
In this module, I’m going to give you some powerful exercises to get crystal clear on your branding and marketing message. By the end of this module, you’ll have created your visual brand, your logo, and your very own branding board.
Lesson 1: Identify Your Ideal Client
These powerful, step-by-step exercises will help you zero in on your target market
Lesson 2: Identify Your Brand’s Personality
This commonly overlooked, crucial sequence of exercises differentiates your brand and makes it infinitely easier for you to create your future content and marketing materials
Lesson 3: Choose Your Color Palette
Here’s where we start to get artistic! (Don’t worry, you’ll be guided every step of the way)
Lesson 4: Choose Your Fonts
We’ll demystify how to choose a stunning font combination
Lesson 5: Create Your Logo
It’s easier than you think!
Lesson 6: Create Your Branding Board
This lesson alone will save you more hours down the road than you could ever imagine!
Module 5: Launch It
In this module, we’ll be digging into the Online Client Attraction Framework so that you can understand exactly how to use your site to get clients. And you won’t just be learning about the theory of how to get clients from your site, we’ll show you the exact step-by-step method for exactly how to do this, from start to finish.
Plus, you’ll learn how to write website content that connects with prospective clients, the three pillars of SEO to help prospective clients find you online, and how to establish the foundations for your online practice (including the insurance you need as a practitioner, the best client management platforms to use when working with clients online, and what you need to know to smoothly run an online practice).
And before you know it, you’ll hit the launch button and pop open the kombucha to celebrate as you sit back, admire your beautiful new website, and watch the compliments (and prospective clients) rolling in.
Lesson 1: The Online Client Attraction Framework
Learn the step-by-step framework for how to use your website to attract clients. Once you learn this framework, you’ll understand how you can take your website from something beautiful to look at into a true marketing arm for your practice.
Lesson 2: Set Up Your Email Service Provider
As a practitioner, growing your list of email subscribers and keeping in touch with them through consistent, valuable content is a vital marketing activity (especially when you’re practicing online!). But first, you need to be able to have a way to collect those email addresses. In this lesson, I’ll walk you through how to set up a free account with MailChimp — one of the most popular email service providers out there.
Lesson 3: Create Your Opt-In Offer and Connect it to Your Site
In this lesson, I’ll show you the exact steps for how to create an irresistible opt-in offer (making it a no-brainer for your website visitors to sign up for your email list). I’ll also walk you through all of the technical steps of exactly how to set up the opt-in offer on your site and connect it with your email service provider so that your website and your email list are seamlessly connected.
Lesson 4: Write Website Content that Connects
In this lesson, I’ll share the three biggest mistakes that most practitioners make when writing their website content and how you can avoid them. Plus, I’ll walk you through the step-by-step method for creating website content that connects.
Lesson 5: Get Started with SEO
If you want your website to show up when people search for services like yours online, you’ll need to understand SEO, how it works, and the steps you should be taking with your website to improve your SEO. We’ll show you how in this lesson.
Lesson 6: Establish the Foundations for Your Online Practice
In this lesson, we’ll cover what you need to know to smoothly run an online practice, including the insurance you need as a practitioner, the best client management platforms to use when working with clients online, systems for booking, payment, and invoicing, and more.
Lesson 7: Learn How to Maintain Your Site
This guide walks you through each part of the backend of your site so that you can manage and maintain your own website with total confidence.
Lesson 8: Launch!
Press the launch button and sit back in admiration of your beautiful, polished and professional new website.
Want a sneak peek at the kind of branding you’ll be creating in Weekend Web Design?
By the end of the course, you’ll have a completed brand board that’s uniquely your own
(or you can use the brand boards we’ll provide!).
For example, something like:
this
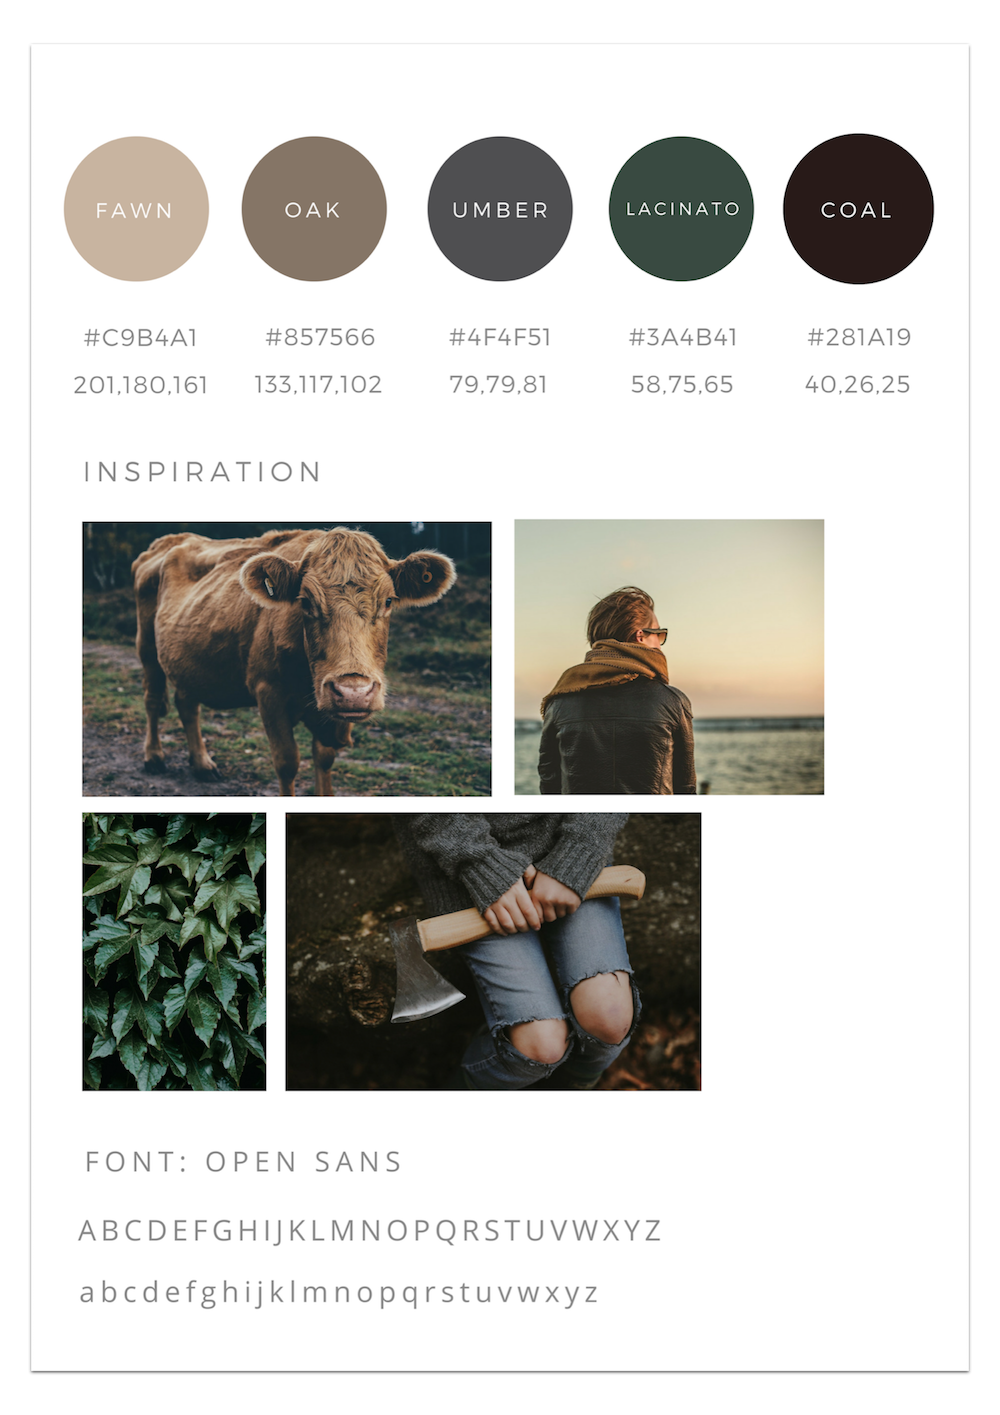
or this
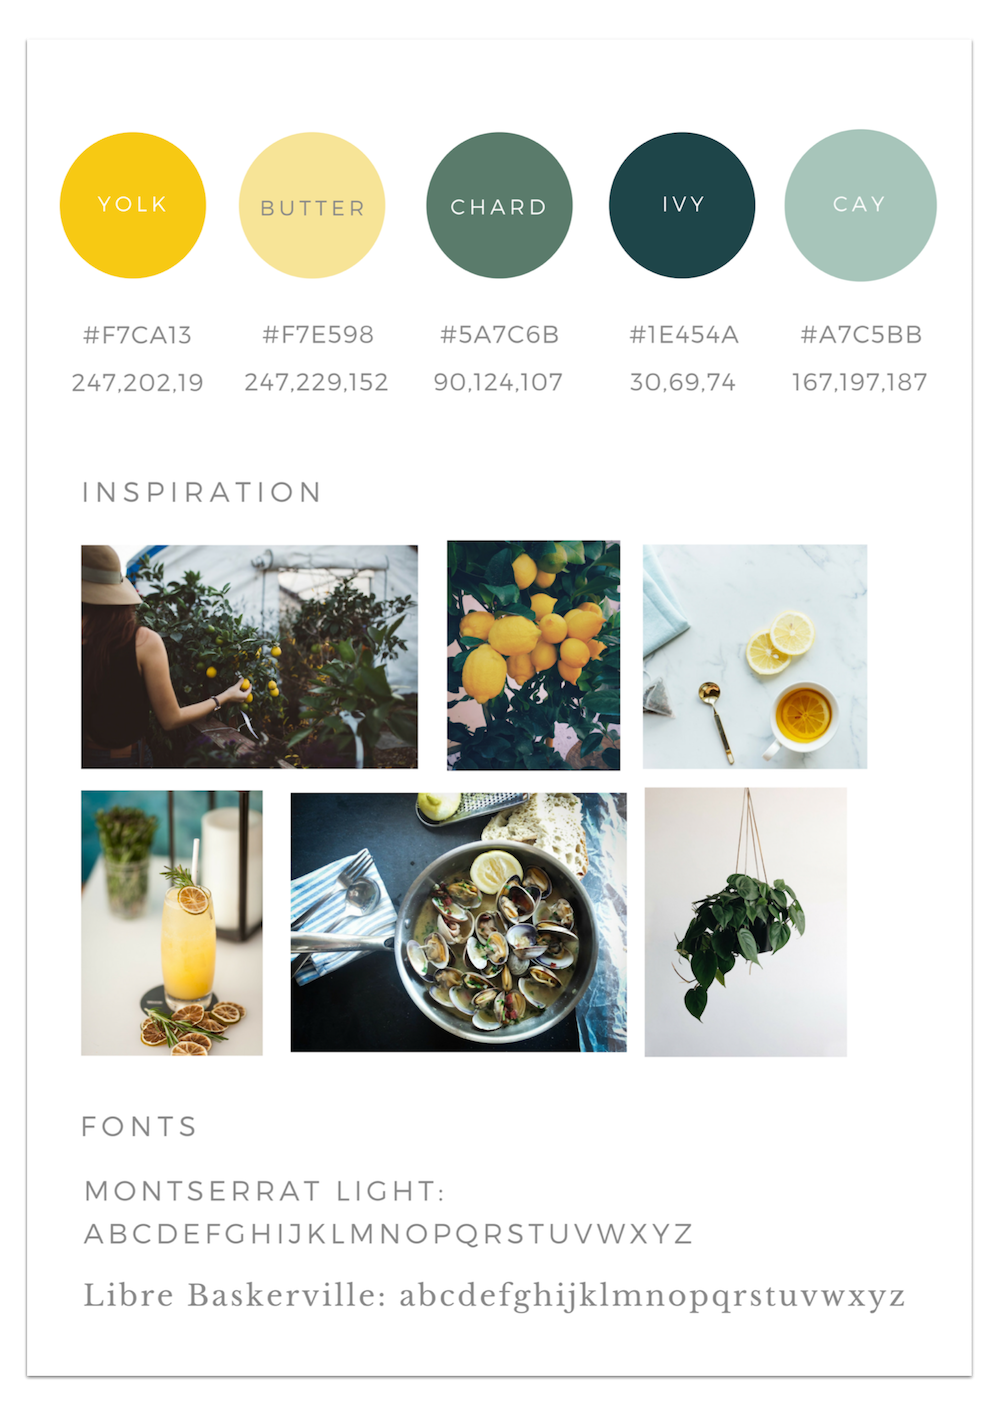
or this
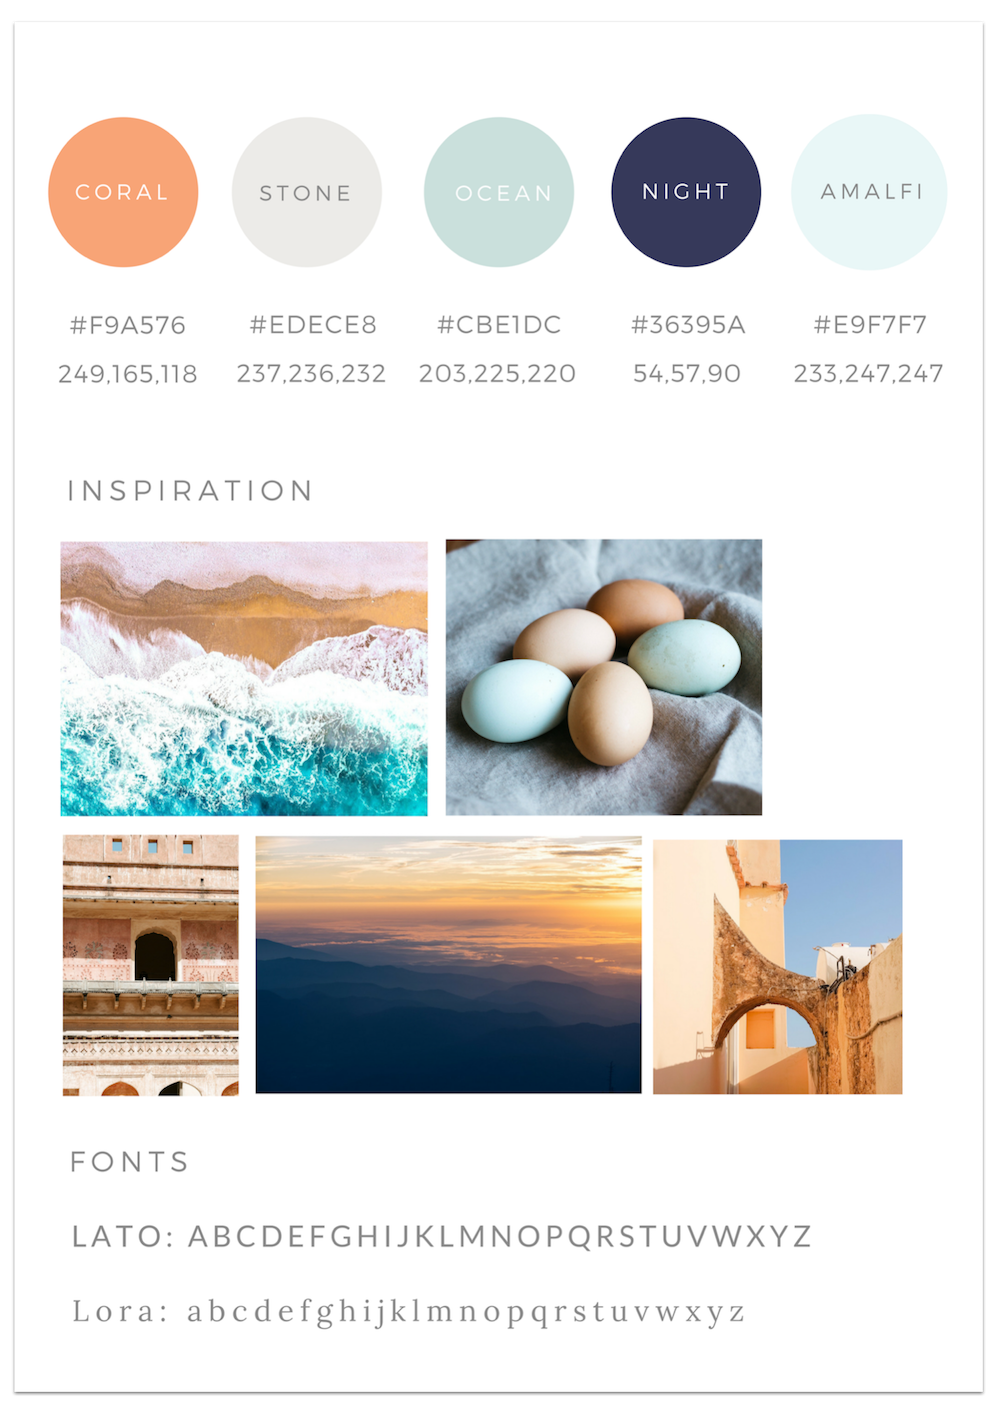
No creative genius required. We walk you through
every. single. step.
MORE LOVE FOR WEEKEND WEB DESIGN
MORE LOVE FOR WEEKEND WEB DESIGN